L298N驱动电机
简要介绍了L298N的接线方式,驱动原理及相关简要代码
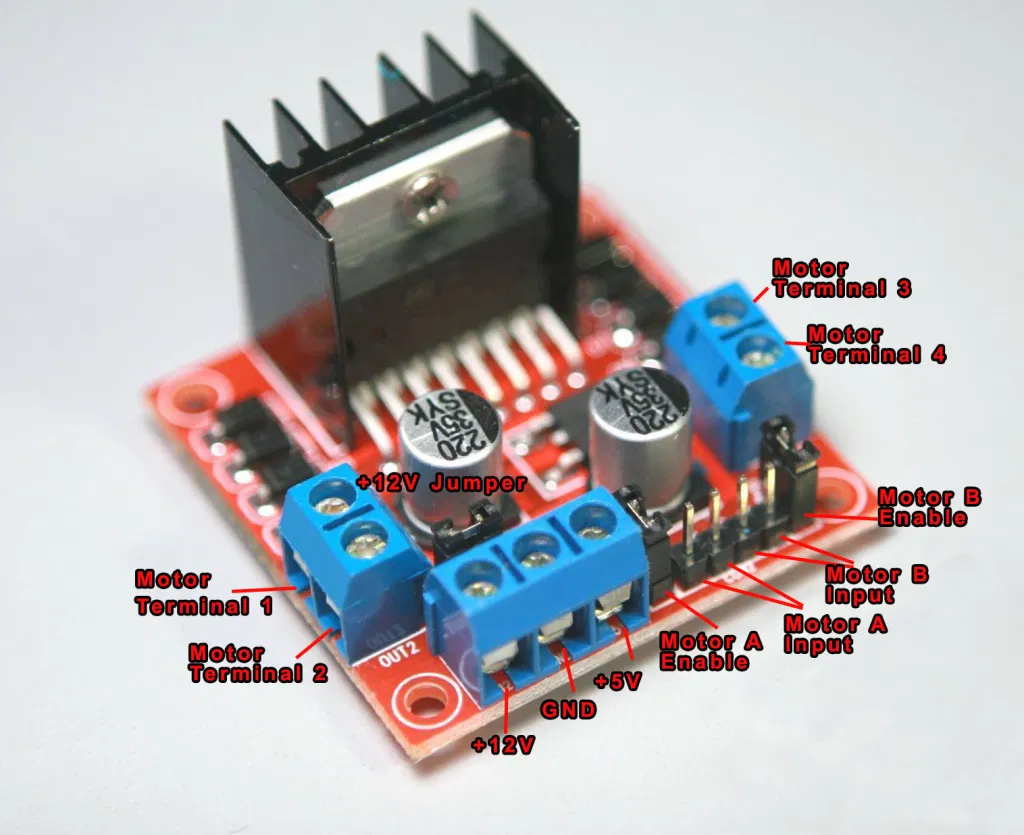
引脚介绍

需要注意事项:
L298N的+12V需要电压在 +7VDC to +35VDC.如果使用的电源超过了12V那么请将跳帽拔掉。
同时需要 mcu 和 L298N 供地。
H桥中,四个input对应四个output(Terminal)


通过对于IN的控制就可以控制out,促使其连接到的电机正转或着反转(并可以控制速度,PWM?)
具体操作逻辑:
对于普通的马达电机:
那么只需要将其正负连接至out1,out2,通过in1,in2来控制正负就可以驱动了。
对于Arduino 来说更为简单。
其中ena非必需(采用跳帽,也可达到效果)
//Motor Connections
//Change this if you wish to use another diagram
#define EnA 10
#define EnB 5
#define In1 9
#define In2 8
#define In3 7
#define In4 6

void setup()
{
  // All motor control pins are outputs
  pinMode(EnA, OUTPUT);
  pinMode(EnB, OUTPUT);
  pinMode(In1, OUTPUT);
  pinMode(In2, OUTPUT);
  pinMode(In3, OUTPUT);
  pinMode(In4, OUTPUT);
}
void goStraight()   //run both motors in the same direction
{
  // turn on motor A
  digitalWrite(In1, HIGH);
  digitalWrite(In2, LOW);
  // set speed to 150 out 255
  analogWrite(EnA, 200);
  // turn on motor B
  digitalWrite(In3, HIGH);
  digitalWrite(In4, LOW);
  // set speed to 150 out 255
  analogWrite(EnB, 200);
  delay(2000);
  // now turn off motors
  digitalWrite(In1, LOW);
  digitalWrite(In2, LOW);
  digitalWrite(In3, LOW);
  digitalWrite(In4, LOW);
}
void loop()
{
  goStraight();
  delay(1000);
}
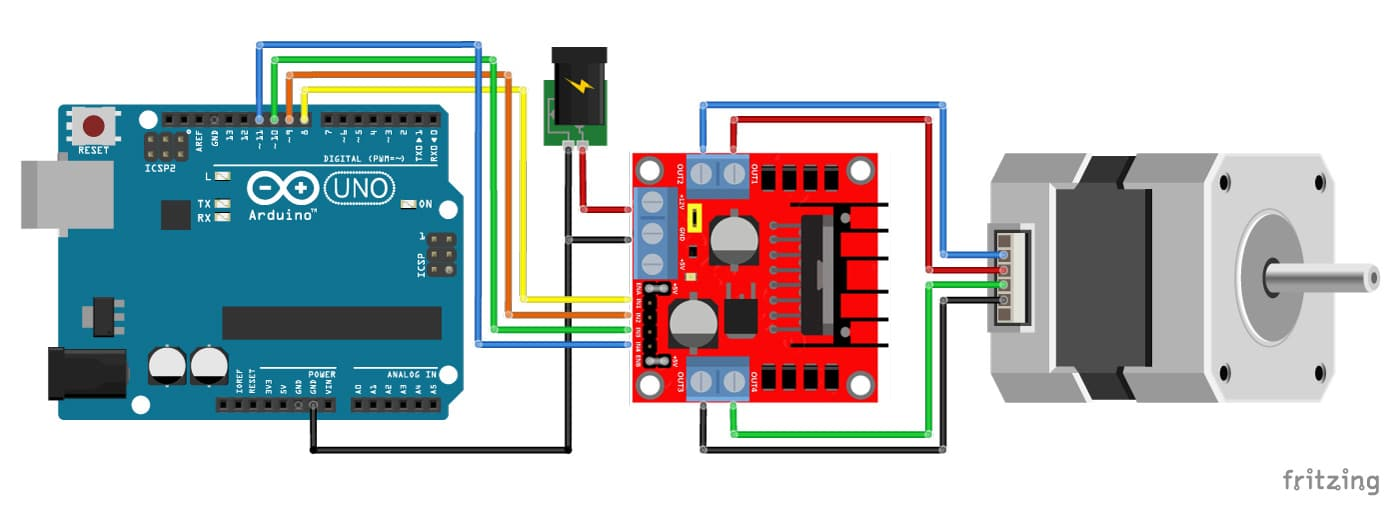
驱动Step moto 28BYJ-48
该继步马达一共拥有五根线,则如果需要采用L298N来驱动,一个L298N那么只能驱动一个继步电机。


/* Example sketch to control a stepper motor with L298N motor driver, Arduino UNO and Stepper.h library. More info: <https://www.makerguides.com> */

// Include the Stepper library:
#include <Stepper.h>

// Define number of steps per revolution:
const int stepsPerRevolution = 200;

// Initialize the stepper library on pins 8 through 11:
Stepper myStepper = Stepper(stepsPerRevolution, 8, 9, 10, 11);

void setup() {
  // Set the motor speed (RPMs):
  myStepper.setSpeed(100);
}

void loop() {
  // Step one revolution in one direction:
  myStepper.step(500);

  delay(2000);

  // Step on revolution in the other direction:
  myStepper.step(-500);

  delay(2000);
}
参考连接:
Stepper Motor with L298N and Arduino Tutorial (4 Examples)
How to Use L298N Motor Driver | Microcontroller Tutorials
Arduino WeMos with L298N Controller and 28BYJ-48 Stepper Motor